If you have a Node.js app and want to run it on your hosting, cPanel makes it easy to do so. You don’t need to be a tech expert. Just follow these steps, and your app will be live in minutes.
Step 1: Log in to your cPanel
• Log in to your cPanel
• Find the Software section.
• Click Setup Node.js App.
Step 2: Create a New Application
• Click the Create Application button.
• Choose the Node.js version your app needs.
• Select Application Mode:
◦ Production – for live websites.
◦ Development – for testing.
• Choose your Application Root – this is the folder where you will put your app files.
(If you want, you can add a new folder to set the application URL. Let's say you want to create an application URL called "testing.example.lk/nodeapp", then add it like this)

• Enter your Application URL (the link to your app).
• Add your Startup File name (for example: app.js or server.js).
• Here is an example of how to fill those fields.
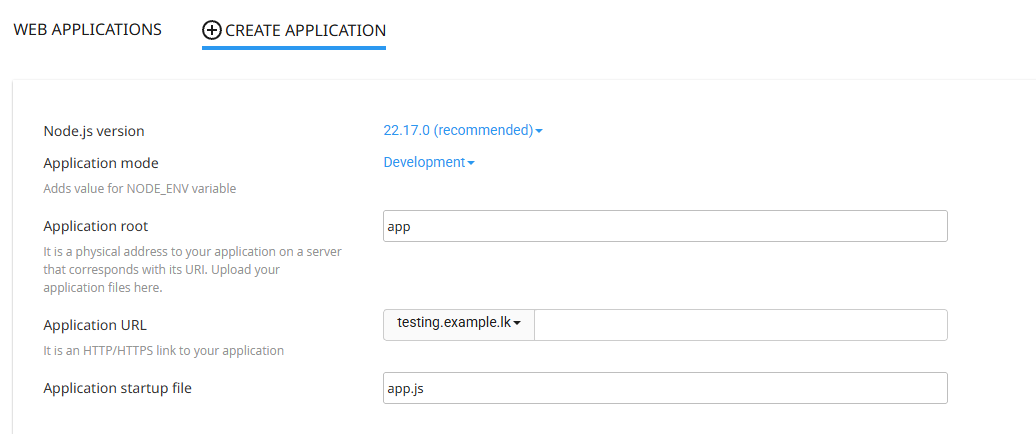
• Click Create.
Step 3: Upload Your Files
• Open File Manager in cPanel or use FTP.
• Upload all your Node.js app files into the Application Root folder.
• Make sure the folder has a package.json file. This file tells cPanel what packages your app needs.
Step 4: Install Needed Packages
• Go back to Setup Node.js App.
• Click Run NPM Install.
• Wait until the installation is done. This will add all the packages from your package.json file.
Step 5: Start Your Application
• In the same Node.js App page, click Restart App or Start App.
• Your app is now running.
Step 6: Test Your Application
• Open your browser and go to the Application URL you set earlier.
• If everything is correct, you will see your app.
Extra Tips
• Environment Variables – You can set special values like API keys or passwords here.
• View Logs – If your app doesn’t work, check logs to see what’s wrong.
• Keep Node.js Updated – New versions are safer and faster.
✅ Done! You now know how to install and run a Node.js app on cPanel. Keep your files safe, update your app often, and enjoy your live project.